Top 10 tips for your car to pass a Mobile Roadworthy !
20 July, 2015
Need to Sell Your Vehicle? 10 Tips to Secure a Safety Certificate
Selling a car requires a bit of legwork to ensure potential buyers feel confident in the quality and safety of the vehicle. Having a Safety Certificate is required for a legal sale and, as buyer confidence is critical to close a sale on a car, it will add that extra boost of confidence that your car is a good purchase.
Know what signs to look for when assessing your vehicle for safety
Tyres – For safety, your tyres have to have at least a sixteenth-of-an inch of tread. The tyre industry has built a warning device into your tyres to alert you when it is close to having less than 1/16 of an inch left in tread by revealing tread wear bars.These bars are solid and appear across the face fo the tyre. Low tread is indicative of decreased traction which is why as soon as tread wear bars appear the tyre should b replaced. Check all tyres for hints of tread wear bars before going to your inspection.
Tyres are crucial for safety, if there are nicks, cuts, or abrasions the tyres functionality is compromised. Inspect your tires carefully for any existing defaults. Pay extra attention to the area along the bead edge of the tyre as it is easy to miss small cuts in this area. Additionally, remove all stone and debris from the tread to prevent tyre damage. If your tyres are damage free and have enough tread they should pass the safety inspection.
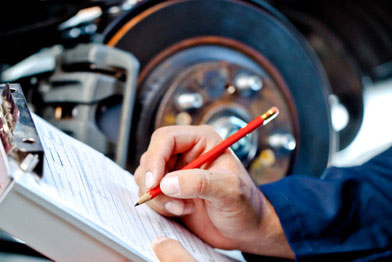
Brakes – Brakes are perhaps the most important safety system in a vehicle. Many motorists assume brakes will last indefinitely; in reality vehicle brakes will only last between 30,000 and 40,000 miles.
If you have disc brakes, check the condition of your brakes by pulling off the right front wheel (the right front wheel bears the bulk of the braking force, so is the one to check). With the wheel removed, check the disc for signs of scoring or gouging. If has many marks and gouges, it is likely that your vehicle’s discs will need to be refaced or smoothed for proper operation.
Replace the wheel, drive, and apply the brakes evenly. If you hear any trace of grinding or metal-on-metal contact, it is time to replace the brake pads. If, as you apply the brakes, you feel an even pulsing in the brake pedal, then it is definitely time for some brake work as you have encountered the brake wear warning. Once a set of pads reaches the point of no return, a set of ridges will cause a pulse to be transmitted through the brake so you know that work needs to be done.
This last brake tip works if you drive a clutch. Set the parking brake and put your car into gear. If the parking brake fails to hold fast and your vehicle doesn’t stall, then it is time for a new set of parking brakes. Parking brakes are usually old-fashioned drum/shoe combinations. Chances are very good that you will only have to have the shoes replaced as the drums themselves are seldom worn down.
Headlights and Taillights – Cars made in the past 30 years require replacing a single bulb and not the whole headlight unit. To check the headlights, have a friend watch as you switch settings to identify which bulb needs to be replaced. Both taillights and headlights consist of three parts: the lens, the reflector and the bulb carrier. You must remove the entire taillight assembly to expose the bulb carrier and select the single bulb that requires replacing. Once the bulb carrier is removed, replacing the bulb is easy; simply twist a quarter turn and the bulb pops out. You can find nearly every bulb size and make at any auto parts store.
Brake lights – Brake lights are multiplexed lights. Brake lights also function as taill ights. They do this by having dual filaments. One filament acts as the taillight while the second lights when you press the brakes. To check them, have a friend stand behind your vehicle – be sure it is in park with the hand brake set. Have him or her watch as you step on the brake pedal. Both rear lamps should light, as should the centre-mounted brake (high-mounted) safety lamp. If one of them fails, replace it using the same routine posted for taillights.
Turn signals – In order to obtain the Safety Certificate (Roadworthy Certificate), all of your vehicle’s safety and warning lamps must function properly. Turn signals are a key safety lamp, and must function properly. With help from a friend, check front and rear turn signals. Turn the car on and press down on the turn both left and right turn signal indicators while your assistant walks from the front to rear on both the left and right sides of the vehicle to ensure both are properly working. Since the hazard flashers employ the same lamps, by checking them, you are also ensuring the hazard lights are working.
Windscreen washer/wiper – Taken for granted by most drivers, windscreen wipers require regular care. Wiper blades last only a short time; general consensus of safety authorities and industry experts is that they should be replaced every 6 months. It’s even better if you can swap them every three months. The reason for the relatively short period between new blades has to do with pollution. Between industrial pollution and urban air quality, the edges of your blades take a tremendous beating. Wipers usually become brittle and their ability to keep the windscreen clean diminishes.
Swapping blades is easy. First, find the proper wiper size in the vehicles owner manual and purchase from a local auto shop. With the new wiper, open the clamp on the back of the blade and slide off the blade assembly. Open replacement wiper, put it over the end of the blade assembly and secure the clamp. If more instructions are required, assembly instructions will be included on the wipers packaging.
The washers should produce a strong stream of windscreen cleaning fluid. To check the washers, press the washer stalk. If there is any restriction, find the washer head feed tube and pull it from the feed point and gently put some air through it to dislodge any obstructions. Once the obstructions are gone, replace the feed tube and cycle the washers to clean things up. If you cannot dislodge obstructions, you can obtain a new set of feed tubes and replace them. Map the placement of the former feed tubes and follow your mapping. It is straightforward. If, however, there is a problem with the washer pump itself, you will have to take your vehicle to a service area. Wiper fluid should also be topped up regularly.
The windscreen should be clear, free of scratches, scarring and scoring. If there is damage to the windscreen have it fixed or replaced.

Heater/air conditioner/demister – Depending on where you live, you must pay attention to the condition of your vehicle’s heater/air conditioner and demister systems. To check the heater, simply turn your vehicle on and let it warm up. Then turn the heater on, if the air just blows out with no apparent heating it is likely that you have a problem somewhere in the in-dash heater coils. The coils may be plugged or your vehicle’s heater/air-conditioner fluid may be low. If the heater core is plugged up, then you will have a large problem because you will have to go inside the dash to fix it. It is best to let a specialist handle this because they will have the proper tools.
Checking the coolant level is easy. You just pop the bonnet open and glance at the coolant levels. Be sure to do this when the engine is totally cool so the reading is accurate.
To check your demister, wait until you have a fairly humid morning and then wait until the windscreen clouds up. Your demister should clear the windscreen without the necessity of turning on the air conditioning (in operation, one would use the air conditioning and demister in conjunction with one another). If the demister fails to provide a warm flow of air, it is likely that the heater core is plugged and must be cleaned to restore it.
Exhaust system – The exhaust system must be completely functional for obvious reasons. First, it provides the backpressure needed so your vehicle’s engine works correctly. Second, the exhaust system also forms the basis of the emissions system. As the emissions system must work correctly so your vehicle can meet current requirements, the exhaust system must be properly working. There are several checks you can perform to be sure the exhaust system is working correctly. The first is a visual check. Pop open the bonnet and look at the exhaust manifold to make sure there is no corrosion and to be sure there are no obvious holes in the system.
After checking under the bonnet, you will have to look under your vehicle, using a creeper (the small wheeled board that many mechanics use to work under a vehicle). Take a torch and look closely at the exhaust system to make sure it is free of holes or dents and other constrictions. Look closely at all hangers and clamps to make sure they are free of corrosion and dirt. Also, if you feel capable, check the inputs and outputs of the resonators, muffler and catalytic converter to ensure that the hangers and clamps are free of corrosion and dirt.
An additional measure to check, if the exhaust system is working properly, is to check the internal condition of the exhaust system. The surest way to check the exhaust is to feel for pulses. To do this, take a rag and cover the tailpipe briefly to feel the exhaust stream. The exhaust stream should feel like a series of even pulses as it exits the tailpipe. If the pulses are not even, it may indicate a problem with the tuning or timing. Or, it could indicate a piston or valve that is functioning incorrectly. If, when you cover the exhaust, you hear a whistling noise coming from the exhaust system that indicates there is a hole that you likely did not see on your inspection. If you do hear this, you will have to backtrack and recheck the exhaust system to see if you can locate the problem.
Belts, Hoses, and Fluids – The final checks to make, as you ready your vehicle for its Safety Certificate, are under the bonnet. Your vehicle’s belts, hoses and fluids should be up to snuff. What should you be looking for? Hoses should be firm to the touch. There should be no spongy spots, no wet spots and no leaks. Pay close attention to the intake and output necks where clamps may gouge the hose. If you see a clamp digging into a hose, replace both the clamp and hose with the proper parts. Belts, on the other hand, should be free of shiny spots. Shiny spots indicate slippage and overheating, two belt-killers. If you spot shiny spots, replace the belt altogether. For a long time, the auto industry “dressed,” or applied oil or a similar petroleum-based substance on a belt to rejuvenate it. The problem was that the “dressing” didn’t last long, and the belt failed again. This is why replacement is the only way to go. If you find a belt is loose – without shiny or worn spots – then all you have to do is find the proper set screw and pulley, and tighten the belt up. If a belt has more than about a-quarter-inch of play, it should be tightened. You can determine tension by placing your thumb on the belt and pushing down.
Fluid levels are essential to a vehicle sale. If the fluids are off, too little coolant for instance, you could find your vehicle running too warm. This could lead a hot prospect to turn suddenly cold. To prevent this, and to ensure that your vehicle operates correctly, make sure that all fluids are up to the top off lines. You will find the lines marked quite clearly on all reservoirs. The fluids to be concerned about include brake fluid, antifreeze/coolant, transmission fluid and windshield washer fluid.

Having a Safety Certificate lets customers know your car is in good shape and makes selling easier. Follow these 10 inspection tips, to help ensure your car passes the safety certificate inspection, and you will be on your way to selling your car in no time.
Top 10 tips to assist your car in passing the Mobile Roadworthy Test